(Terragen 4) HSV色空間でのカラー調整
TG4でモデルをインポートするとき、TG4内でマテリアルやテクスチャの色を調整したいことがよくあります。
その際に、RGBではなくHSVで、特に色相をずらしたいという需要が(個人的に)めちゃくちゃあります。
TG4には、HSVのそれぞれの値からRGBを組み立てるノードがあります(Build HSV Colour) また、大気やSurface shader等に載っているカラーピッカーはHSVで色指定できます。
でも、RGBをHSVにして、かつ色を調整するようなノードはありません。
テクスチャを扱う際には大抵Image map shaderを使用しますが、ここでの色の調整もRGBだけです。

やろうと思えば、こんな感じでConstant colourノードとAdd colourノードを繋ぎ、色の加算で調節することはできますが、そんなに使い勝手がいいわけではありません。
(もしもっといい方法があるよ!!って方は是非教えてほしいです)

というわけで、任意のColorからHSVモデルで、かつスライダ入力で調整できるノードネットワークを作りました。
 結構巨大。
結構巨大。
モノはTerragen公式のユーザーフォーラムにアップしてあります。tgcファイルをダウンロードし、File→Insert clip fileでtgcファイルを指定してください。
RGB to HSV conversion
上部のINPUTブロックにあるRed/Green/Blue to scalarに、元のColorを繋ぎます。 下部のManipulatorsブロックにあるノードで、H, S, Vそれぞれをオフセットします。 最終的な出力は、右下のOUTPUTブロックから出てきます。
RGB→HSVの変換式はこちらの記事の通りです。
hooktail.org
サンプルとして、MEGASCANSからダウンロードしてきた紫陽花のモデルを使用します。
H, S, Vすべてのオフセットを0にした(何もいじっていない)場合です。

Manip. Hノードでは、Hue(色相)の値をオフセットします。0のとき+0度、1のとき+360度です。加算した結果が[0, 360]になるように丸めます。
こちらは0.25(+90度)したとき。

Manip. Sノードは、Saturation(彩度)の値をオフセットします。0のとき+0、1のとき+1です。スライダでは入力できませんが、負値を入れれば彩度を落とす方向にオフセットします。 なお、彩度は区間[0, 1]に制限されます。
こちらは0.3としたとき。

Manip. Vノードは、Value(明度)の値をオフセットします。スライダの値をそのまま加算します。こちらも、負値を入れれば明度を落とす方向にオフセットします。 なお、明度は区間[0, 255]に制限されます。
こちらは1としたとき。

以上です。
おまけ
このノードを使って作ったCGです。結構いい色になったと思う。

(Terragen 4) OpenColorIOを試す
本記事の対象Terragen 4バージョン:Professional (Educational含む)
Terragen 4.5で追加された新機能,「OpenColorIO」統合を試してみたのでその記録。 今はまだFrontierビルドなので,詳細は今後変わる可能性が大であること,ご了承ください。
なお,本記事はPS社のチュートリアルを参考に書いています。
OpenColorIO - Terragen Documentation from Planetside Software
OpenColorIOは一種のカラーマネジメントシステムですが,詳細はググってください。私もあまり知識無いので。。。ほぼTG4単独で作業してる私には,マルチアプリワークフロー向けの機能って使う機会がないのですが,そのうち後工程で使うよって方にご依頼いただいたときに対応できるように。。。
準備
まずはOCIOをダウンロードします。 PS社のチュートリアル記載のリンクはいつの間にか死んでいましたので、以下のリンクからどうぞ。
「Sample OCIO Configurations」をダウンロードします。ここでは「E:\OCIO\」に保存しました。
Downloads
中にはいくつかのプロファイルが入っています。PS社の推奨通りace_1.0.3を使うことにします。

中には設定ファイル(.ocio)が入っています。このパスを,「ファイル名を含めて」環境変数「OCIO」に追加します。


ここまで出来たら,Terragen 4を起動し,左下の「Project Settings」をクリックします。

v4.5からは,Project SettingsにColour Managementタブが追加されています。

「Use OCIO」にチェックを入れると,プロファイルが選択できるようになります。 また,3Dプレビューでも若干違いが出るはずです。(デフォルトシーンでも,空が若干緑色になると思います) もしここで何も出てこない場合は,ファイルの保存場所や環境変数を見直してください。
なお,この設定はプロジェクトファイルごとになるため,忘れないようにチェックする必要があります。

さて,Colour Managementタブでは,以下の4つの設定を選べます。
Display spaceは,ディスプレイ出力(モニタ出力)への設定です。
Rendering spaceは,レンダリング画像(3Dプレビューも)に適用される設定です。
Shader paramsは,TG4のシェーダーノードの色パラメータで使用されるプロファイルです。大気には適用されないようです。また,いくつか例外もあるようです(今後ドキュメント化されるとのこと) なお,ここ選択される設定は線形色空間を持つ必要があります。
8-bit texturesは,Image Map Shaderで「convert to linear」(Colourタブのやつかな?)が有効になっているテクスチャに適用される設定です。
デフォルトの選択ルールはTutorialを参照ください。
とりあえずデフォルトシーンでレンダリングしてみます。
まずはOCIO無効

有効

少し緑かかってしまいますね。チューニングします。
MainタブのBluesky horizon colourを(135, 135, 135)、TweakタブのBluesky density colourを(147, 178, 255)にします。


いい感じになりました。この設定をベースにして作業を開始するとよいでしょう。

7/4 18:46とりあえずここまで。
(Terragen 4) PBR Node Generator
TL;DR
Tiny desktop application to generate Terragen 4 node network to import PBR textures into Terragen 4 has been released.
Available for Windows / Mac OSX
It is still prototype and C&C is welcome to improvement it!
Background
When you'd like to use the PBR workflow in Terragen 4, you will take some steps. First, you prepare Image Map Shaders for each map, such as Albedo, AO, Displacement, etc. Next, enter common properties, e.g., projection, flip texture, repeat mapping, size, .. Finally you will prepare a Default Shader, and connect all Image Map Shaders to the Default Shader. With this application the workflow will be easier. This generates nodes and automatically sets above common parameters. If you use MEGASCANS assets, it is done more easily. You can import texture paths and physical size from that JSON file.
Download unavailable as I am rewriting the application to support Terragen RPC feature introduced in v4.6. Release target is Dec. 2022 or Jan. 2023. The app will be Python-based.
How to Use
Set texture paths
When you run the application you will see this window.
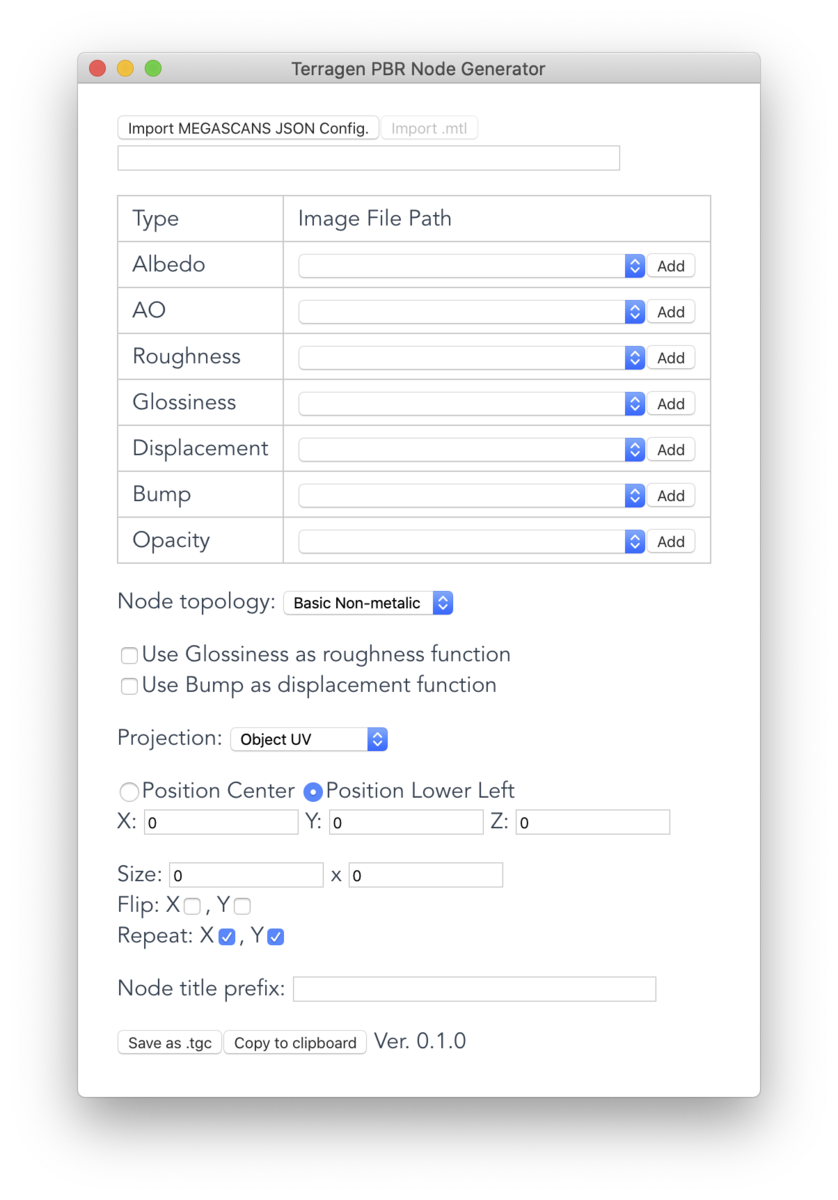
If you want to use MEGASCANS asset click "Import from MEGASCANS JSON Config." and select a JSON file located in the asset folder.

The application automatically reads the selected JSON and extract texture paths. The texture paths are listed in the selectbox. Note that the application checks existence of the texture file. The path will not be listed if the file is not in the directory.
If you want to use another texture, press "Add" and choose a texture you want to use.
If the path is blank the corresponding Image Map Shader will not be generated. For example, if the asset does not contain Displacement map, the application skips generating Image Map Shader for displacement map.
Select network type
Next, you can choose node topology. Currently three types are available.
Basic - Non-metalic

Basic - Metalic

Basic - Mixed (v0.3.0+)

The nodes are generated in align with the instruction on the official forum.
PBR Workflow
Check "Use Glossiness as roughness function" if you use glossiness map as roughness function. (roughness map is ignored)
Check "Use Bump as roughness function" if you use bump map as displacement function. (displacement map is ignored)
Set common properties
Now let's fill out properties used in among Image Map Shaders.

You can set "Projection", "Position", "Size", "Flip X/Y", and "Repeat X/Y". Physicalsize Value written in the JSON is used for "Size".
Also you can set Node Title Prefix. If you import MEGASCANS JSON the asset ID will be set as the prefix. Each node will be titled like "scnmyqp0 - Albedo"
Parameters in the Default Shader are set as shown in the table below. Values not listed in the table will be default.
| Basic - Non-metalic | Basic - Metalic | |
|---|---|---|
| Diffuse color | 255,255,255 (white) | 0, 0, 0 (Black) |
| Reflectivity | 0, 0, 0 (Black) | 255,255,255 (white) |
| Reflection tint | 255,255,255 (white) | 255,255,255 (white) |
| Index of refraction | 1.5 | 10 |
| Roughness | 1 | 1 |
Export network
The network can be exported by the buttons at the bottom of the window. The application can save network as TGC, or copy to clipboard.

Known Issues & Bugs
- "Basic - Metalic" has not been enough tested yet.
- [OS X] The settings are erased when you close the window by the red close button.
- Size written in the JSON is used while it should be 1 when UV mapping.
Demo
DEMO - Terragen node network builder that generates node network to import PBR textures into TG4.
— ao@空を作る人@Embers Melody新加入 (@aokcub_cg) 2020年5月26日
This small app reads json files attached in the MEGASCANS assets and extracts texture paths. If you don’t use MEGASCANS you you can set texture paths manually. #terragen pic.twitter.com/PG02WiIjkN
(development version is used in the demo)
Download
Sorry temporary unavailable.
I am working to update app to support v4.5.
Feedback
As of now this app is prototype version. To improve the functionality and usability, your feedback is welcome!
If you have any idea, please tell me on the Planetside forum!
Also let me know if you have any problem.
Version History
May. 31st, 2020 Prototype (v0.2.2).
Jun. 3rd, 2020 v0.3.0. Added "Basic Mixed" mode, mix both Non-Metal/Metal by a merge shader.